21/04/2022
| in category:MEN'S PARKA - DETAILS
MEN'S PARKA - DETAILS
If you think sewing a parka is beyond your reach, we'll prove to you that this is a project for everyone! When you buy a DIY kit for a women's ANNA, children's ARIEL or men's TOM parka, you get in one package:
- a die-cut for the parka printed directly on the softshell (including seam allowances and a pattern that will create a neat composition when the parka is sewn together)
- fabric for the hood lining and pockets (and a paper die-cut for these elements)
- zipper with a zipper tag
(in the women's and children's parka you will also find self-locking calico eyelets and cord)
We have already written about how to sew a parka in this article: HOW TO SEW A PARKA FROM A DIY KIT. Today we will focus on the differences, because the men's parka has a different, really interesting pocket (sewn on the front of the parka, not hidden in the seam, as in the case of ANNA and ARIEL) and a different finish of the back slit.
We start with the pockets. When sewing a parka, prepare and sew the pocket at the very beginning, even before joining the other elements together.
Each pocket, and there are two, consists of:
- two flap elements,
- the front of the pocket,
- the pocket lining made of the provided fabric (cut it out according to the attached die-cut).

We recommend backing the knitted part with interlining. We used Vilene 33g in white to make it more visible in the tutorial - we recommend you to match the color of the interlining to the color of the knitted fabric.

In the pictures below you can see the front of the parka with markings where to sew the pocket. In your case they will look slightly different, but be sure to stick to them when sewing.

Lay the elements of the flap right side to right side, sew as in the second photo. Trim the seam allowance, cut the corners. Turn the flap over to the other side, push out the corners and quilt the flap across the top.

Use a serger to hem the top of the front of the pocket, fold inward 1.5cm and stitch.

Pin the pocket lining and the pocket front together - LEFT side of the lining to the RIGHT side of the pocket front. The lining is a little longer and the resulting difference is supposed to stick out from the top of the pocket. Sew the pocket together on three sides, hem the edge of the fabric on the serger.

Turn the pocket right side out, push out the corners and align the whole thing. Take the PAPER die-cut of the pocket and transfer the markings from it to the side of the pocket. Quilt the pocket twice (as in the second photo). This is where you will be putting your hand into the pocket, so you don't want the lining to "come out".

Fold the excess lining fabric to the back and pin it along with the entire pocket to the front of the parka.

Sew a pocket to the front of the parka. Sew near the edge. At the top of the pocket, leave an unstitched space for inserting your hand. And of course, do not sew the side at the height of the previous pocket quilting.

That's how it should look at this stage.

Using the markings on the front of the parka, arrange the flap over the pocket and sew it on. Then fold it towards the pocket and quilt for more than the seam allowance you made by sewing the flap to the parka. Thanks to this you can hide the seam allowance inside the seam.
If you like it, you can add a pocket fastener, for example, in the form of a snap closure. However, we do not consider it essential.

THE BACK OF THE PARKA - THE BOTTOM FINISHING
The back of the parka, as in the ANNA and ARIEL designs, consists of two pieces. Use a serger to hem the edges that will join together. Do not hem around the bottom (as in the photo).

Assemble the bottom hem pieces and pin together. Sew the section from the marking to the end (you can see the marking in the last photo).
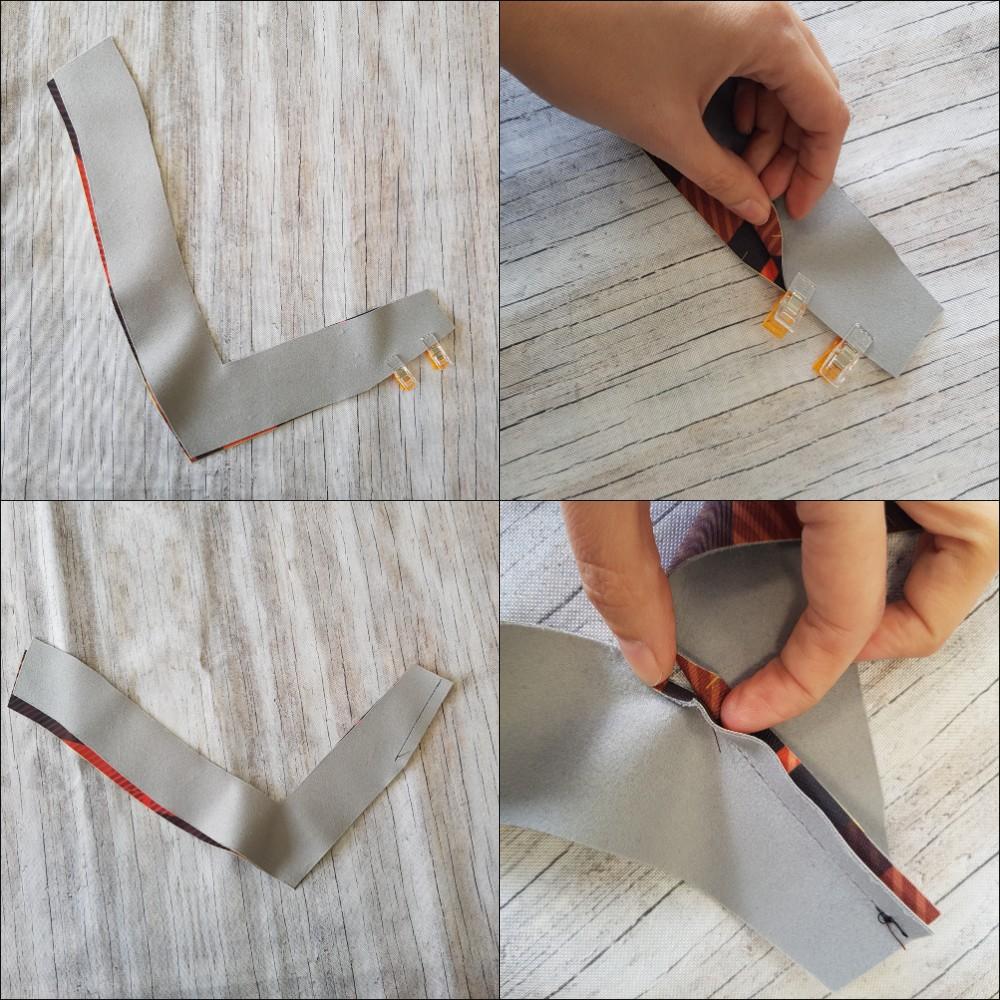
Sew the back of the parka on the multifunctional machine. Sew to the marking.
[zszyj do oznaczenia - Sew to the marking]


Sew the hemstitching to the parka. It is very important here that you do not sew the sewing in the back slit all the way to the top.


Quilt the hem.

Ready!

Iwona Bartczak
Małgorzata Michalewska
Post Comments (0)
To add a comment, you must be a registered customer.
click here to log in


